The Great Tape Bake Off

Sticky tapes

One of the many challenges we face when digitising audiovisual material from magnetic tape is “sticky-shed syndrome”. Certain types or formulations of tape suffer from this problem that, as the name implies, causes them to literally stick to the components of the playback machine creating a phenomenon known as “stiction”. The friction of the sticky tape against the metal parts causes screeching/squealing noises and slowed/ uneven speed of tape playback. Sometimes the machine will slow down and grind to a halt. If you haven’t encountered this phenomenon before you could be forgiven for thinking it’s a fault on the player. Playback of sticky tapes can result in damage to the tape and in some cases, the playback equipment. The magnetic oxide material sheds from the tape resulting in a distorted signal and dropouts which compromise the quality of the digital transfer. Extreme sticky-shed can cause catastrophic damage to a tape and result in partial or complete loss of the often unique audiovisual material contained on that tape.

A magnetic tape which has been so affected by shedding that the oxide which holds the magnetic information (brown), has completely come away from the polyester base (clear) rendering the information unrecoverable. Picture by Anothermelbournite, Wikipedia

Ingredients

Magnetic tape consists of a plastic base layer (substrate), a layer of magnetic oxide or metal particle material (the brown stuff that contains the audiovisual signal) with lubricants and a binder which glues the oxide/metal particles to the base. Some tapes contain an additional back-coat on the base designed to lubricate the motion of the tape through the player and reduce friction.

Structure of magnetic tape, picture from https://publish.uwo.ca/~dspanner/LIS9670/lect11.htm

The problem of sticky-shed results from a breakdown in the binder resulting in hydrolysis i.e. absorption of water. The urethane molecules in the polyurethane binder react with the water, making them migrate to the surface of the tape where they cause the stickiness.

The issue is difficult to identify by visual inspection but suspect tapes should be tested before attempting playback by slowly turning the reel and observing whether the tape unspools naturally or sticks/lingers on the pack. Sometimes the tape surface can exhibit a soft/gummy quality. The problem of sticky tapes has become more apparent over the last 30 years as tape stock ages and patterns of binder breakdown have been identified. Certain brands manufactured entire batches of tape with a faulty binder formulation which almost invariably suffer from sticky-shed. This makes it easier to identify a tape that will have problematic playback before placing it in/on the machine.

Recipe

Thankfully, for most cases of sticky-shed there is a solution – “Baking” the tapes i.e. heating them gently for a period of a few hours. For this purpose, I use a food dehydrator as it is suitable for lower heating temperatures and maintaining them more consistently than a conventional oven. My ultimate goal is to obtain an incubator which operates at the most consistent temperatures over long periods but for now, the dehydrator does the job well. Any apparatus used should not contain strong magnetic fields which can damage the tape’s content. A digital thermometer allows easy and accurate temperature monitoring.

Food dehydrator used for “baking” tapes with sticky-shed syndrome

Baking at 54.4°C (130°F) is the sweet spot to temporarily reverse sticky-shed syndrome. The duration required varies for each format but should be at least 2-3 hours with tapes flipped once or twice then allowed to cool for at least the same length of time. Once baked, there is a short window of a few days to digitise before hydrolysis makes the tape sticky again. It’s wise to carry out the process during drier weather conditions as humidity in the air will speed up hydrolysis. A tape can however, be re-baked several times and this is often a requirement for some of the more stubborn formats anyway. As there isn’t 100% consistency of tape behaviour, it can be a case of trial and error – bake for the minimum time, manually test unspooling of tape and carefully attempt playback. If not successful, bake again and so on until the tape plays back correctly.

The main tapes to look out for are:

• Reel to reel audio tapes – Ampex/Quantegy (mid 1970s into the early 1990s) and Scotch/3M. Bake for 3-6 hours.

Ampex 1/4″ audio tape reel

• U-matic video tapes (1975-1985) by Ampex, AGFA and Sony – those affected often have a wax crayon type smell. The tape reels should be removed from the cassette shell for baking. Bake for 8-16 hours.

Sony U-matic video cassette

• EIAJ ½” open reel video tape – particularly Sony branded V60H, V62 and V30H Helical Scan. If the tape is back coated, it will require baking. These tapes often require long bake times, I have found that manually winding and cleaning with a lint-free cloth after baking can improve playback results. Bake for 8-16 hours, sometimes multiple bakes are required.

Sony 1/2″ video tape reels

• Quad 2” open reel video tape. We don’t currently have any of these in our archives but due to their large size they require extended baking times – up to 24 hours.

Other formats can occasionally suffer from sticky-shed too e.g. Betacam (oxide formulation), VHS, Hi8, even MiniDV.

If you are in doubt as to whether a given tape has sticky-shed syndrome it is much safer to bake it than play it.

Audio compact cassettes are an exception in that the faulty binder was not used in cassette formulations. However, some cassettes can suffer from stickiness due to fatty acids migrating to the surface of the tape. I have baked some notoriously sticky mid-1980s EMI cassettes for 2-4 hours with excellent results.

Slow cassette:

Baked cassette:

The Raw and the Cooked

Just to confuse things, some tapes can also suffer from a different type of Soft Binder Syndrome which can cause squealing on playback. These are often non back-coated tapes and leave less of a deposit on the playback path. It is not recommended to bake these as it can exacerbate the problem. Some success has been achieved by playing back this kind of tape in a cold environment, even placing a playback machine inside a refrigerator. Other tapes display a problem where the back-coat of the tape is turning to powder leaving a non-sticky accumulation of powder on the playback heads. These also shouldn’t be baked but cleaning will be necessary. Finally, never bake an acetate tape. These can be identified when held up to a bright light and visible light can be seen coming through the tape pack.

Despite these exceptions, the most common type of tape degradation you are ever likely to come across is sticky-shed syndrome.

It’s always worth that extra effort to ensure our AV material is preserved in its optimum form.
Happy Baking!

Nigel Bryant
Audiovisual Digitisation Officer


The challenges (and rewards!) of preserving video from MiniDV tapes

DV or digital video tape is a format that was launched in 1995 and remained popular until the late 2000s. There are a few varieties of this type of tape but I want to discuss the consumer format known as MiniDV.

Video cassette and Mini DVD cassette
1 – VHS cassette and Mini DV cassette

DV technology brought a considerable jump in quality from previous camcorder formats such as VHS and Hi8 with more compact and relatively affordable equipment. This made MiniDV a popular choice for arts organisations to document their work so we have a lot of these tapes in our more contemporary theatre and live art collections.

During 2023/24 I worked on the preservation of the audiovisual material in the Rideout collection which includes around 150 MiniDV tapes. Rideout, subtitled Creative Arts for Rehabilitation was established in 1999 by Saul Hewish and Chris Johnston to develop innovative, arts-based approaches to working with prisoners and staff within UK prisons.

The condition of the tapes indicated that they had been stored fairly well with no signs of physical damage or mould which can often be a problem when tapes are stored in conditions with varying temperature and relative humidity.

The process of preserving the audiovisual material on DV tapes involves copying the digital information encoded on the tape to a digital file on a computer. This differs from the process for analogue tape such as VHS which requires a digitisation process i.e. analogue to digital conversion. Copying the data from tape gives the optimal audiovisual quality and also has the benefit of retaining metadata such as the time/date of the recording, camera settings used, and error information. The tape must be played back in a suitable DV playback machine aka “deck” or camcorder in real time and the digital information on the tape can be copied directly to a computer using a Firewire cable connection or IEEE 1394 to give its correct technical name.

electrical cable
2 – Firewire (IEEE 1394) cable

The first challenge is that Firewire technology is obsolete. It used to be a fairly standard interface, especially in Macintosh computers but now you need to install a Firewire card to your computer or use some kind of converter cable. We use the first option.

The second challenge is that playback decks or camcorders for DV tapes are no longer manufactured so second-hand units must be purchased. The price for professional decks is rising as the demand for preserving DV based material increases. We currently have four pro decks which all need occasional servicing to keep them running properly. Engineers familiar with this type of equipment are also getting harder to find.

piece of equipment for digital videocasette recording
3 – Sony DSR-1500P DVCAM deck

So we have our deck, firewire cable and computer – this is the basic equipment needed to copy DV tapes. I also use a video monitor, amplifier and speakers to monitor the off-tape signal directly during playback.

Another challenge I discovered with this particular collection of tapes was that a fair proportion of them had been recorded in long play (LP) mode. None of my four professional DV decks are long play compatible so it is not possible to make a good quality digital copy of those tapes with them. There are a couple of professional decks that will play long play tapes but they are extremely hard to find and are accordingly very expensive. The solution was straight forward – most Mini DV camcorders will play Long Play tapes back well and are still an affordable option (£100 or less on eBay).

One of our main challenges with the tapes themselves is that they are prone to errors caused by signal dropout of video and audio from dirty or damaged tape. DV uses a technique called error concealment to try to disguise this dropout – this can include replacing the affected area with the same corresponding pixels of the previous frame or next frame (most common). Sometimes this strategy works so well that it is not noticeable in the resulting file, especially with static frame shots that contain a high degree of visual similarity from one frame to the next. However, when there is lots of movement, error concealment can cause the image to appear glitchy or blocky.

image with errors blocking
4 – Error concealment causing blocking effect on person’s face

Audio errors can result in jarring clicks or loss of signal. Sometimes fast forwarding or rewinding a tape can remove errors, on other occasions manual cleaning of the video heads may be required. Even where the errors cannot be eliminated by these methods, tapes often don’t behave consistently when played back – they can display errors over certain sections and on subsequent plays fail to display the same errors or show errors in different sections of the tape. This behaviour can actually be used to our advantage in creating the best preservation copy possible which I will explain shortly.

In order to copy the information from the tapes to create our digital preservation files we need suitable software. Most Non-Linear Editing (NLE) software packages including Adobe’s popular Premiere Pro no longer support tape-based workflows. There are some older freeware options but these are no longer technically supported and can be unstable or unavailable for certain operating systems. Thankfully, the international community of video archivists and engineers has come to the rescue (literally) with a versatile free open-source solution called DVRescue. Open-Source means that end users and developers have the freedom to study, improve and redistribute the software.

screenshot of outdoor event with timecode and date
5 – Detail of DVRescue capture interface

DVrescue supports many of the commonly used professional DV playback decks and its capture interface displays timecodes, time & date of recording as well as a real-time graph of errors detected during the capture. Once your tape capture is completed the software has an analysis tool that pinpoints the position and nature of each error so that you can examine the effect on the video/audio in your file. Finally, there is the option to package the captured raw DV stream into a suitable file container – we use Matroska which is an open standard media container commonly used in video archives.

There are additional features in DVRescue that can be accessed via the command line, most useful of these for me is the merge function. This allows you to take two or more separate passes of the capture and combine them. The process takes advantage of the inconsistency of error display on subsequent plays, mentioned earlier, to return one file containing the best frames from each pass. By capturing short sections of video over known error regions and merging these with your master capture you can create the optimal preservation file.

command text
6 – DVRescue merge command

So far so good, we have a set-up that can optimise our DV captures and produce greatly improved results from previous workflows. However…remember those Long Play recordings I mentioned earlier? The ones we have to play back with a camcorder? Well the camcorder is not supported by DVRescue so we have to use an alternative capture software. I use a discontinued software called Scenalyzer for Windows, this doesn’t have any of the sophisticated error reporting or analysis tools present in DVRescue but it does allow us to capture the tape in AVI format and retain the recording’s metadata. The files can then be analysed using a standalone piece of open-source software called DVAnalyzer.  Errors can be identified and located and further corrective tape passes can be made. The resulting files must be converted to a raw DV stream before they can be merged with DVRescue to produce a best quality master copy. This conversion is done using an open-source command line tool – FFMpeg. We can then merge the files as before and re-package the master to a Matroska container.

So we have our workflow for producing preservation copies of these digital tapes. This is all great as long as your tapes are behaving but amongst any collection of DV tapes you will inevitably find problems.

  • Tapes that are dirty. Playback may be improved by cleaning – I do this by using one of my decks that I can open up to access the tape path, I then hold a special cleaning swab lightly against the tape and fast forward and rewind it. This isn’t always successful but has definitely improved the performance of some tapes.
  • Tapes causing “head clogs” – within seconds of playback the picture and sound will drop out due to particles shedding from the tape. The deck will not play back any tape until the heads have been manually cleaned. Cleaning and sometimes “baking” i.e. heating the tape to 54°C for a few hours) can improve performance. Where the head clogs are severe, tapes will have to be captured in sections with manual cleaning of the heads in between – a laborious and time-consuming process.
  • Damaged cassettes – the cassette shell may be damaged and prevent it from playing back or even being accepted by a deck. For these, the tape reels can be removed and transferred into a replacement cassette shell to achieve playback. Due to the size of the tapes this can be a fiddly process.

All that remains after our digital preservation copies have been produced is to create access or viewing copies for each file. These are smaller, more manageable files suitable for easy playback or sharing. I create these using a Non-Linear Editing (NLE) Software e.g. Premiere Pro or Shotcut which allows me to make adjustments for optimal viewing before creating the access copy file. All the digital files are then securely copied to and stored on the university’s Research Data Storage Facility.

I’m happy to report that I’ve managed to produce digital preservation copies of every DV tape in the Rideout collection. Some are perfect with no errors whatsoever, the majority have a few minor errors which may or may not be noticeable and just one has substantial errors throughout, although most of the contents of the tape can still be viewed and listened to. A fair bit of painstaking work was carried out to preserve the collection but I believe the additional effort required to get the optimal results is well worth it. Overcoming the challenge of obsolescent technology to preserve and do justice to these unique cultural works and their creators brings its own rewards.

Nigel Bryant – Audiovisual Digitisation Officer, University of Bristol Theatre Collection

Firestarters project update: March 2023

In 2021, the Theatre Collection successfully applied for a Research Resources Award from the Wellcome Trust for the ‘Firestarters’ project to make available the archive of the arts organisation, Welfare State International (WSI). The project was developed in response to demand to explore WSI’s innovative methodologies from a broad spectrum of researchers and practitioners and the archive will provide evidence and inspiration for future research and practice.

Founded in 1968 by John Fox and Sue Gill, Roger Coleman and others, WSI was a loose association of freelance artists brought together by shared values and philosophy.  WSI evolved from radical travelling performers to become embedded community artists and celebrants, working to weave art more fully into the fabric of life.  Under the Welfare State umbrella, a remarkable group of engineers, musicians, sculptors, performers, poets and pyrotechnicians invented and developed site-specific theatre in landscape, lantern processions, spectacular fireshows, community carnivals and participatory festivals.  The scale of the archive means that the project will take over three years to complete.  A comprehensive archive catalogue will be published online, key material will be digitised for preservation and access, and conservation work will ensure the long-term survival of this important collection.

The ‘Firestarters’ project to catalogue and make accessible the archive of the arts organisation, Welfare State International (WSI) is now underway, so we thought we’d share a project update and highlight some of the work we’ve done so far.  This first part of the project has focussed on establishing physical and intellectual control of the collection as well as safeguarding the long-term viability of the AV material through conservation and digitisation.

Cataloguing

As Project Archivist, I’ve undertaken background research and produced a full production list of more than 400 performances, events and projects for the period Welfare State International were operational to assist with the sorting process.  The first sort of 245 boxes has been completed and the second, more detailed, sort is underway with all performance-related material from the original accession now sorted by production. I assigned temporary reference numbers to all the AV material enabling digitisation to begin.

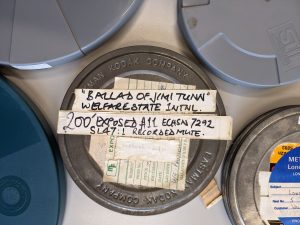
Metal film canister from WSI archive labelled with white tape that reads 'Ballad of Jimi Tunn' Welfare State Intl
Example of WSI film canister

AV digitisation

Since December 2022, Nigel Bryant, AV Digitisation Officer has digitised 146 magnetic and optical media items across 17 different formats including U-matic, VHS, Betacam, Hi8, Video 8, CD audio and DVD.  Both preservation archival quality copies and viewing copies have been produced. Digital copies of duplicate material have been identified and discarded and summary content descriptions of all digitised AV have been recorded.  Essential servicing of AV equipment also took place across several formats to ensure optimum quality of digital copies was maintained.

Video highlights have included a copy of the Barrow community film ‘King Real & The Hoodlums’ (1984) from 1” video tape, so very good quality.  The film was made for TV and involved 150 local people; script by Adrian Mitchell based on King Lear.  In addition to the film, there is also a recording of ‘King Real – making of’ feature from BBC Newsnight, which includes interviews with cast members from the local community.  This year is the 40th anniversary of the making of ‘King Real’, an occasion which has been marked by some of those involved in the film from WSI and the local community with a celebratory singalong in Barrow.

There are also recordings of other TV programmes featuring the work of WSI including the BBC2 programme Open Space with footage of ‘A Midsummer Night’s Belfast’ from a community residency in Belfast, June 1983, and the Thames TV programme Afternoon Plus featuring preparations for ‘Parliament in Flames’, interviews with WSI members, as well as audience reactions to the large-scale spectacle.  In addition to recordings of performances, there is extensive coverage of Ulverston Lantern Processions from the 1980s-1990s.

Footage of international projects includes rushes and an edit of a WSI performance ‘The Wasteland and the Wagtail’, a special commission for the 1st International Theatre Festival in Toga Village, Japan from July 1982, a complete set of high quality rushes from ‘False Creek: A Visual Symphony’ from World Expo ‘86, in Vancouver, Canada, footage of a performance of ‘The Dead Carpenter’ at Rotterdamse Kunststichting, The Netherlands in 1976, and rushes and edit of ‘Tempest on Snake Island’ for the Toronto Theatre Festival in May 1981.

Manual Film Inspections

In preparation for creating access copies for the cine film within the collection, Nigel and I have undertaken manual film inspections for all 152 16mm films, in addition to 7 Super 8mm films.  Before undertaking manual film inspections, I tested all the film for acetate film base degradation (vinegar syndrome), using A-D strips.  The small A-D strips are placed in the can and left for a specified amount of time depending on the storage conditions; the strips change colour to indicate the level of deterioration.

Manually inspecting each film is essential, so an assessment can be made about whether the film would be safe to run on a Steenbeck (flatbed film editing machine) to create access copies.  The inspection included identifying the film type and any edge codes to date the film, as well as measuring the film and core diameter to ensure appropriate storage.  A section of film was measured and compared to stock film to assess whether the storage conditions over the years had caused the film to stretch or shrink.

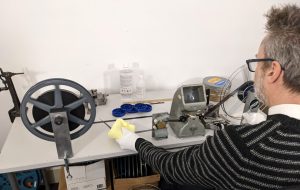
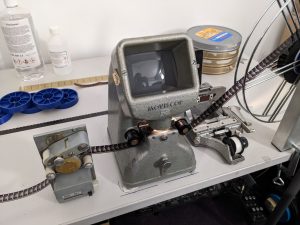
As the image below shows, the film was then manually wound onto a core, through a duration counter and viewer, so the film could be viewed, notes about the content recorded, and an estimated duration taken.  The film was also lightly cleaned during this process.  With manual film inspections, although possible to view the moving images, it is not possible to listen to any sound recordings, which makes the content more difficult to identify.

Man manually winding 16mm film from reel onto core
Nigel Bryant, AV Digitisation Officer manually winding film from a reel onto a core
16mm film passing through a duration counter and film viewer
16mm film viewer and counter

The majority of the films within the collection were stored on 2” cores or projection reels, so during the inspections all the films were wound onto the larger 3” cores for optimum storage.  Each film was assessed for physical damage including scratches, perforation damage, mould, dirt and oil, warpage and colour fading.  Splices were also inspected and repaired or reinforced where required.

Within the collection there are a few 8mm and 35mm films, which will be inspected once additional equipment can be sourced.  As can be the case with older formats, the equipment required to play or view them is often scarce and therefore can be expensive.

There’s been some great footage on the 16mm film, including some projects filmed for TV, one for the arts programme Aquarius with footage from a 3 week residency in Burnley in 1975 including the final show featuring a large procession and ice sculpture, a 1982 performance of ‘Doomsday Fair’ and an early performance from 1973 made in Rotterdam.

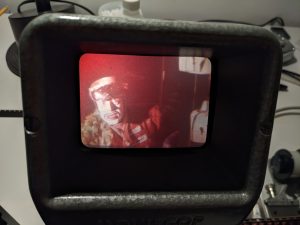
Still from 16mm film of man with black and white makeup wearing black google and red military style jacket
Still from 1972 WSI performance seen through 16mm film viewer

There is also some footage of a naming ceremony on Bodmin Moor from the early 1970s and the South West tour of ‘The Travels of Lancelot Quail’ from 1972, which was one month of processional theatre from Glastonbury through Somerset, Devon and Cornwall.  The footage includes the finale of the performance, as the group of performers climb aboard a boat on the beach at Marazion and head out to sea and board a submarine.  It’s been brilliant to see moving images of performances, having only seen a few photographic images whilst sorting the documentation.

We look forward to posting more project updates as we go!

Siân Williams, Project Archivist